 QQ咨询
QQ咨询
AWS使用site to site VPN 与 Fortigate 进行本地连接配置
介绍
我们将解释如何构建可以低成本连接 AWS 和本地环境的 Sit-to-Site VPN。 本地端(客户端)的VPN设备为Fortigate。 Fortigate 是使用 CLI 而不是 GUI 构建的。
站点到站点 VPN 允许您在静态路由和 BGP 之间进行选择,以在 AWS 和本地之间进行路由。 在这种情况下,静态路由没有问题,因为它是单一配置,但在一般的生产环境中,我们会使用线路冗余,并设计成即使一个系统出现故障,也会使用BGP自动切换。 因此,这次我们就用BGP来搭建作为测试。
构成
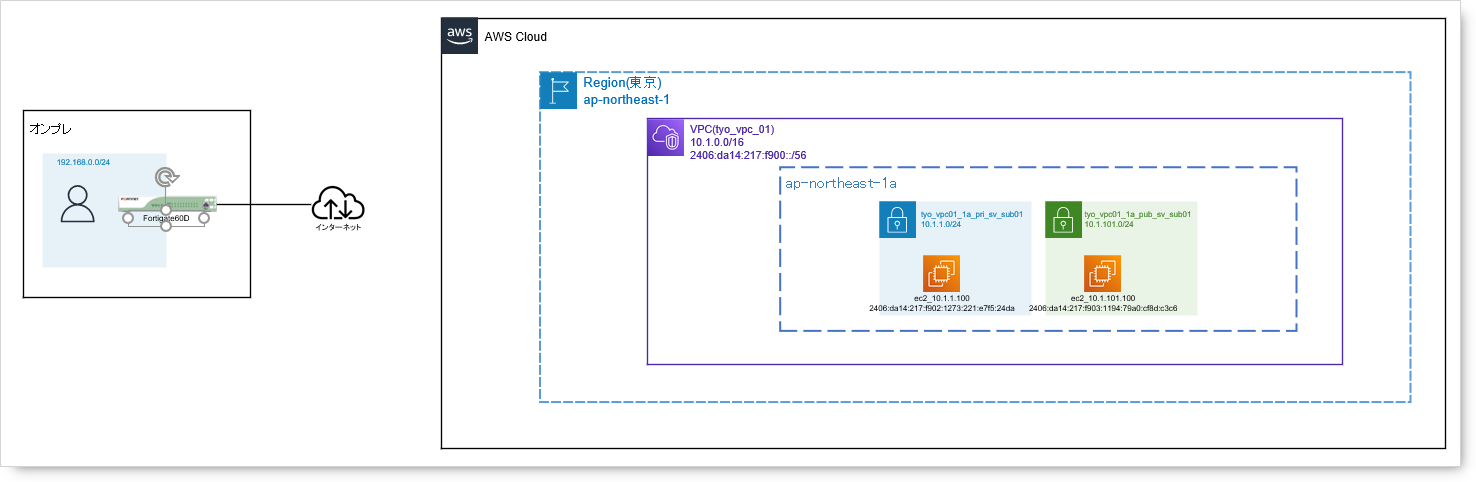
构建开始时的配置如下。 基础VPC、子网、EC2实例等以及本地侧的Fortigate均已搭建完成。
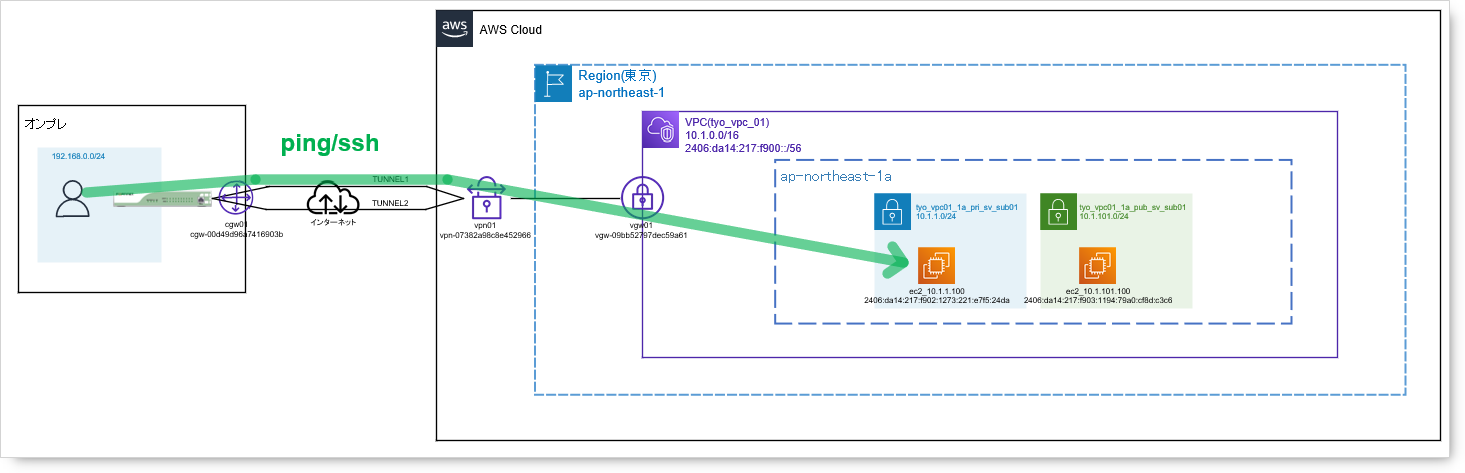
下图为本次搭建后的配置,适用于本地到AWS VPN搭建。
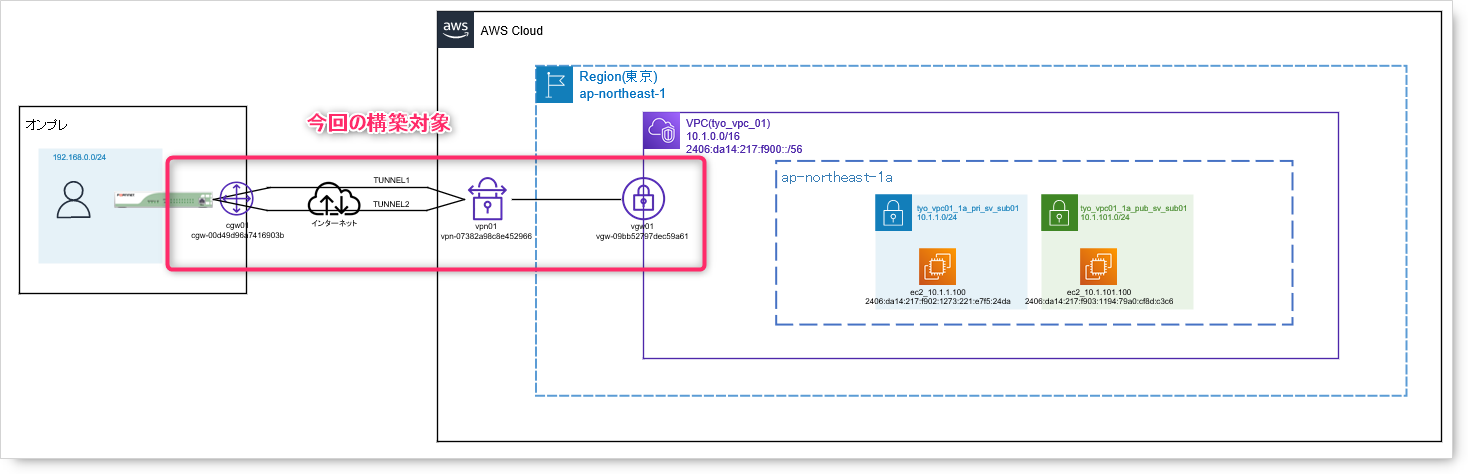
稍后我会解释如何设置。
设定(AWS)
配置 AWS 客户网关
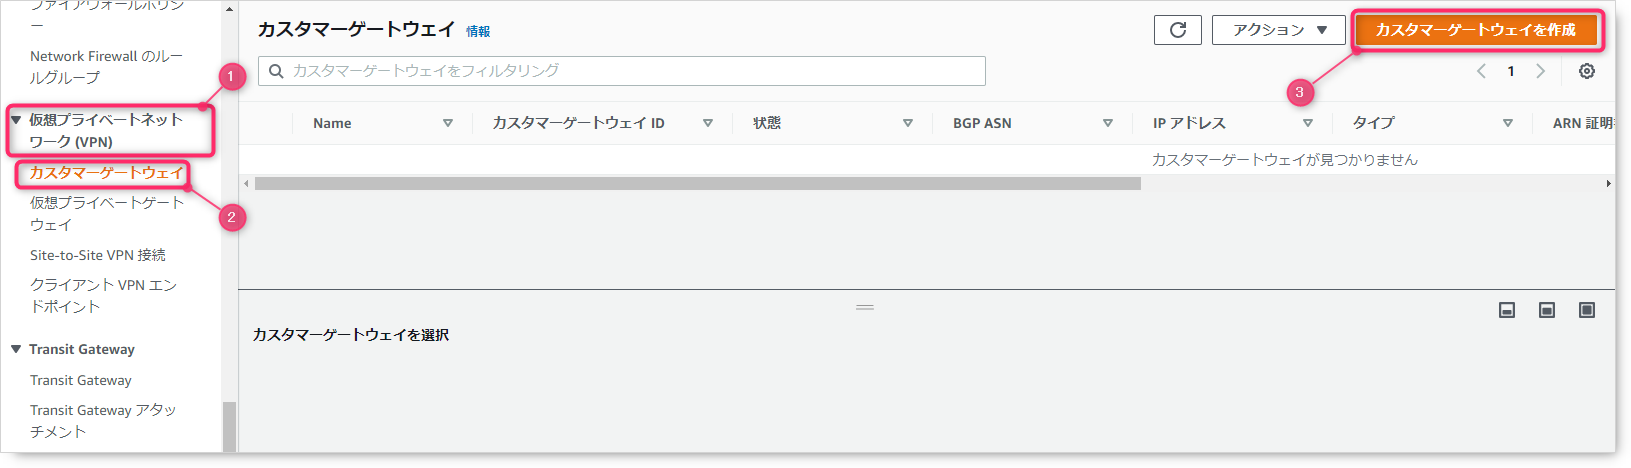
从「VPC」中,选择「虚拟专用网络 (VPN)」>「客户网关」>「创建虚拟专用网关」。
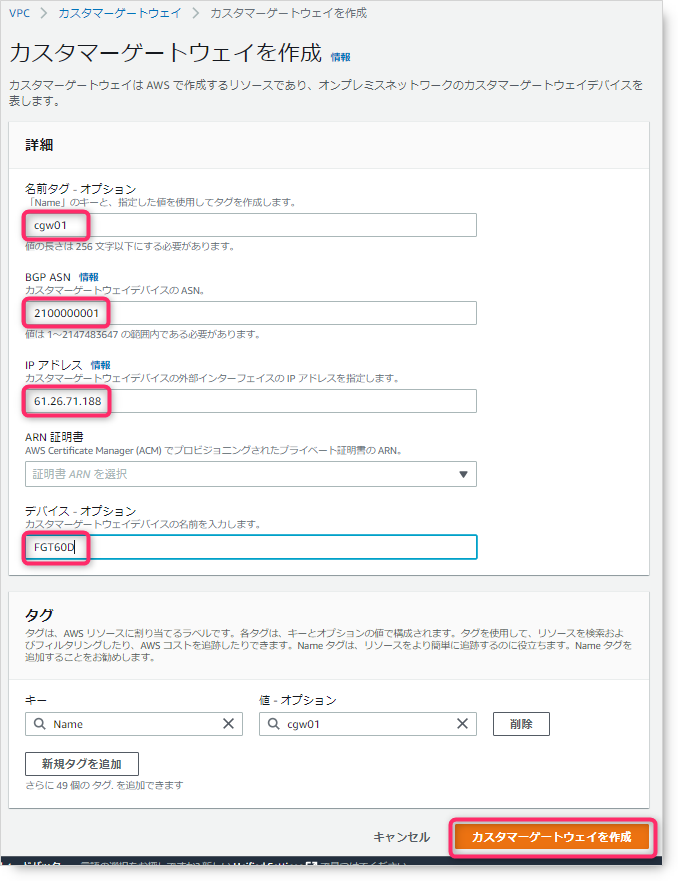
当出现“创建客户网关”屏幕时,输入如下图所示的参数。
“BGP ASN”可以是4字节格式,因此我们将其设置为2100000001。 该 ASN 是稍后将在 Fortigate 的 BGP 中配置的 ASN。
“IP地址” 指定Fortigate的WAN侧接口的地址。 (IPsec终端IP地址)
全部输入完成后,点击“创建客户网关”即可完成。
确认其变为“可用”。

虚拟专用网关
然后选择“虚拟专用网络(VPN)”>“虚拟专用网关”>“创建虚拟专用网关”。
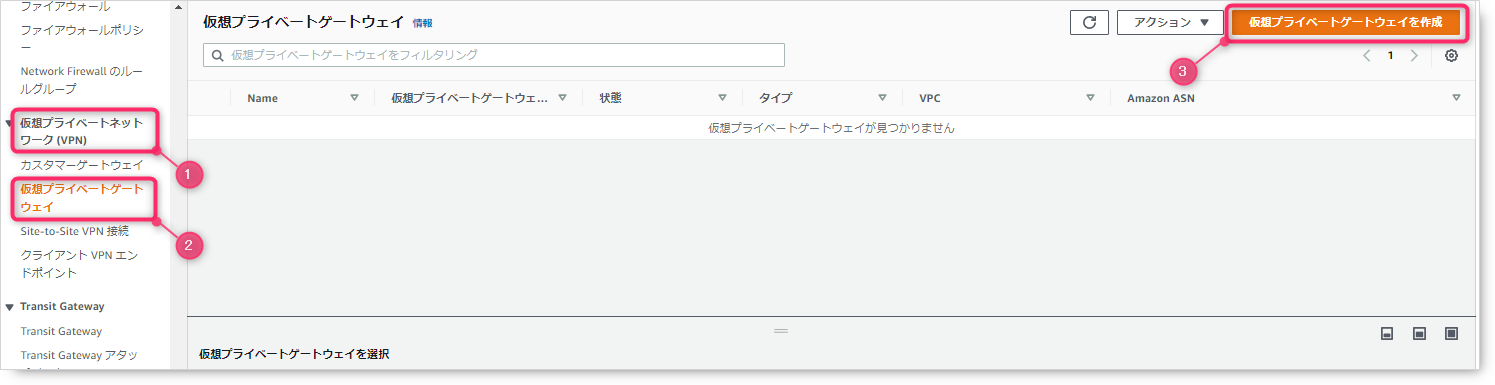
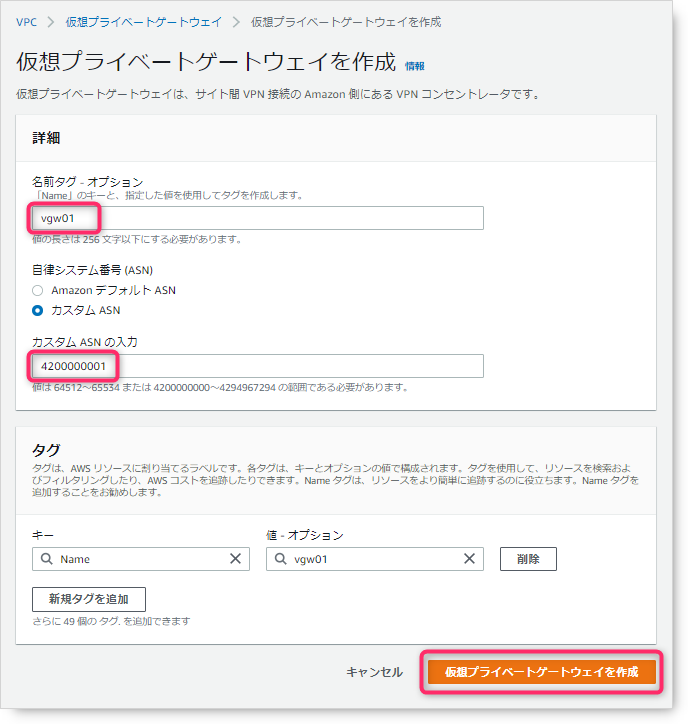
当出现“创建虚拟专用网关”屏幕时,输入如下图所示的参数。
有一个“自定义ASN输入”选项,亚马逊默认的ASN没有问题,但由于我想管理AS号,所以我选择了自定义ASN并将其设置为4200000001。 这是AWS 端BGP 使用的ASN。
输入完成后,点击“创建虚拟专用网关”即可完成。
将您创建的虚拟专用网关附加到您的 VPN。

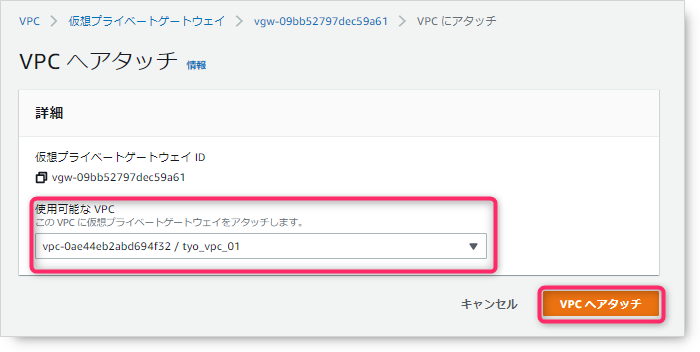
连接后,状态变为“已连接”。

站点到站点 VPN 连接
然后选择虚拟专用网络 (VPN) > 站点到站点 VPN 连接 > 创建 VPN 连接。
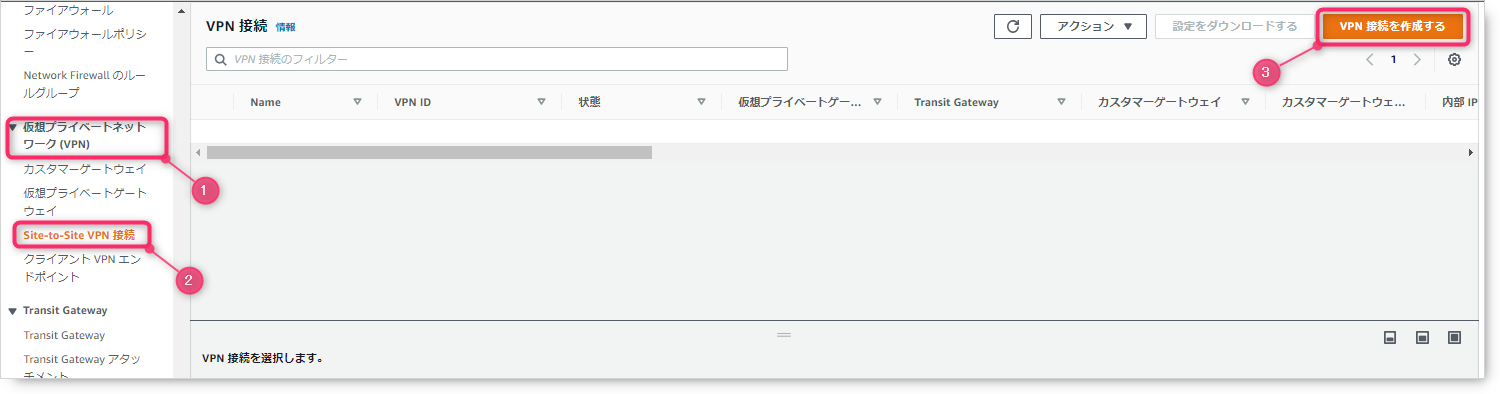
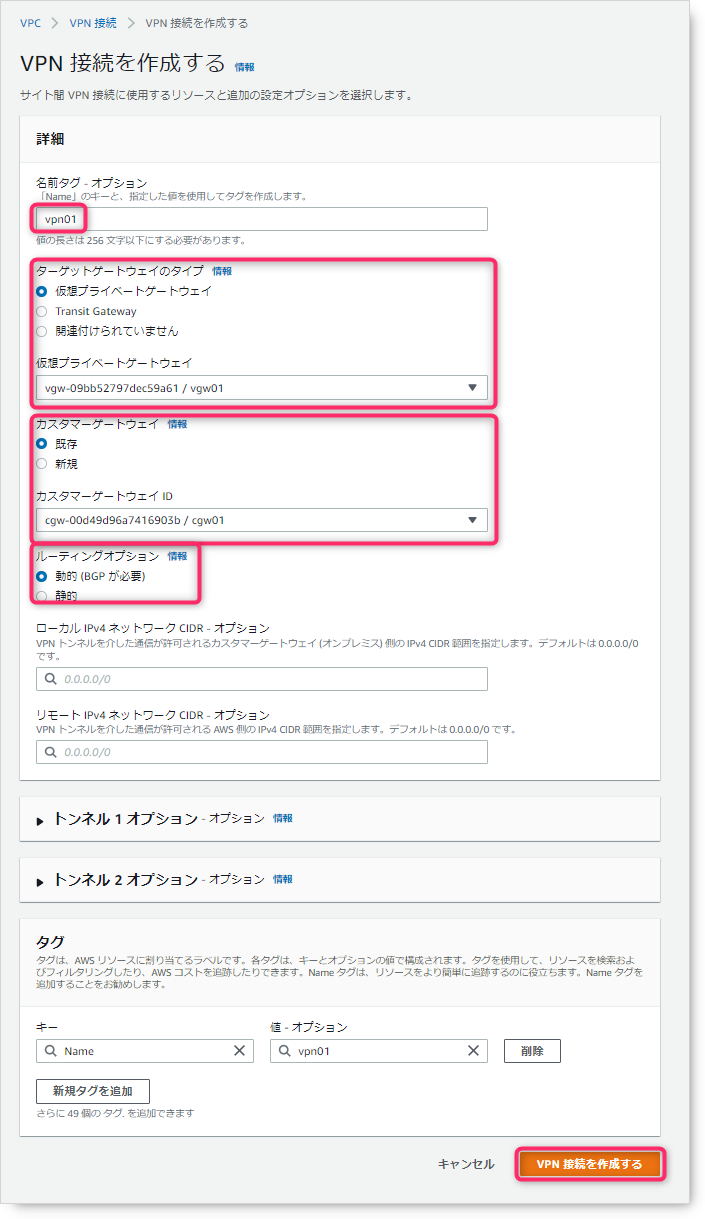
当出现“创建 VPN 连接”屏幕时,输入/选择参数,如下所示。
指定上面创建的两个“目标网关类型”和“客户网关”。
“路由选项”使用BGP,因此选择“动态(需要BGP)”。
否则,默认情况下,单击“创建 VPN 连接”即可完成。
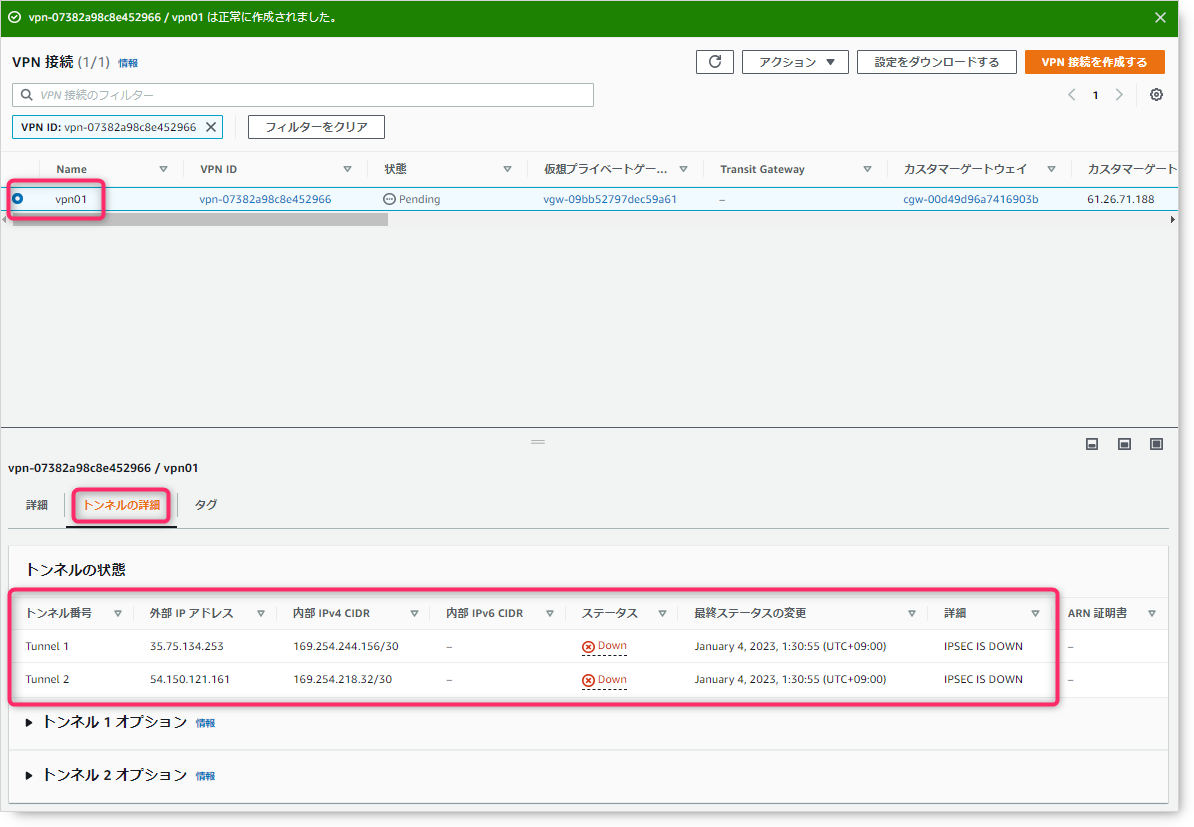
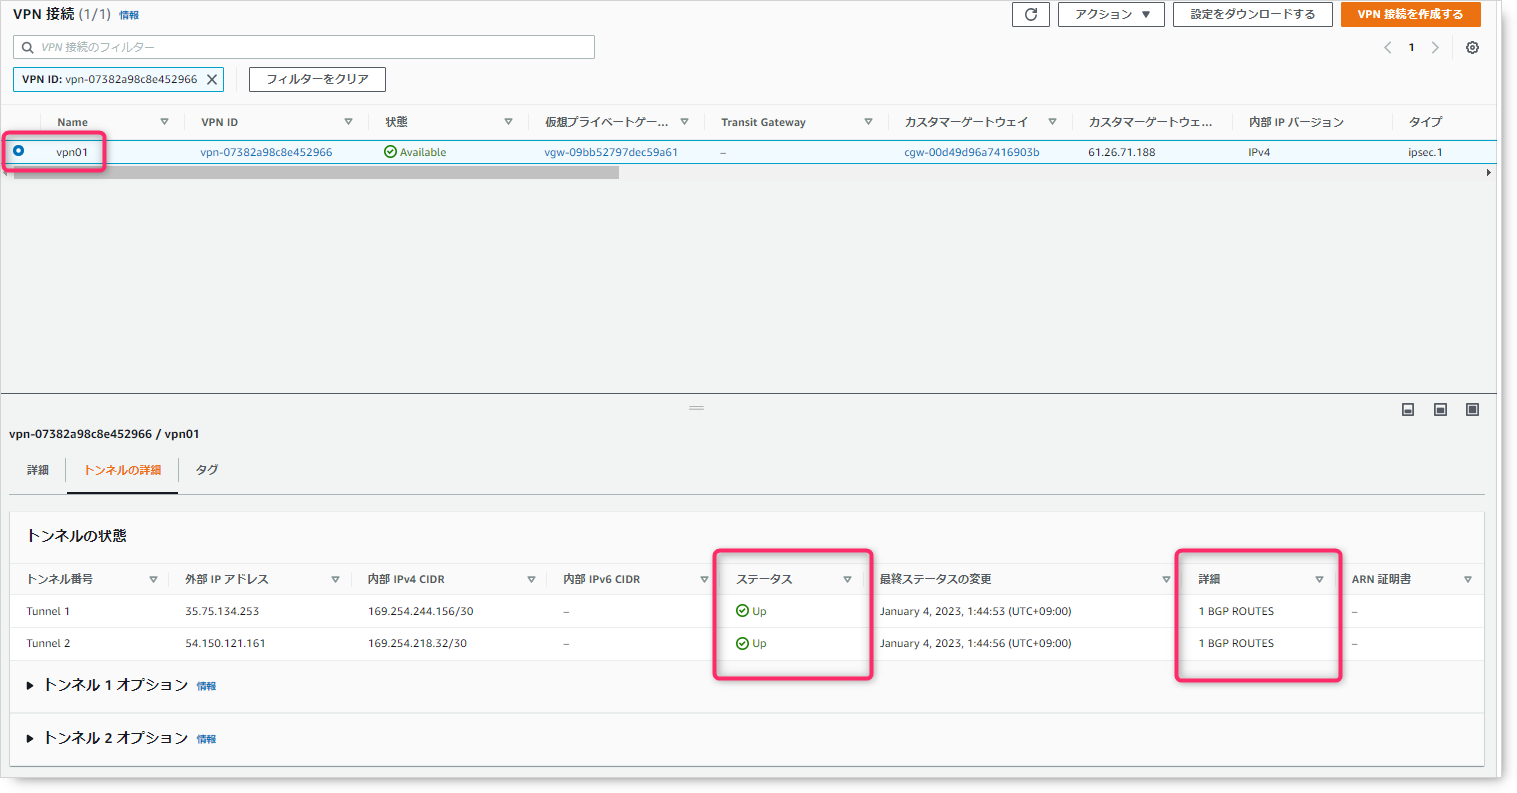
如果继续到此,您可以检查 AWS 端的状态。 选择您之前创建的“VPN01”并参考“隧道详细信息”。
准备了两条隧道,因此存在Tunnel1和Tunnel2。
“外部IP地址”是AWS端终止IPsec的IP地址。
“Internal IPv4CIDR”是为隧道接口设置的网络地址。 它还用作 BGP 邻居地址。
“状态”代表VPN和BGP的状态。
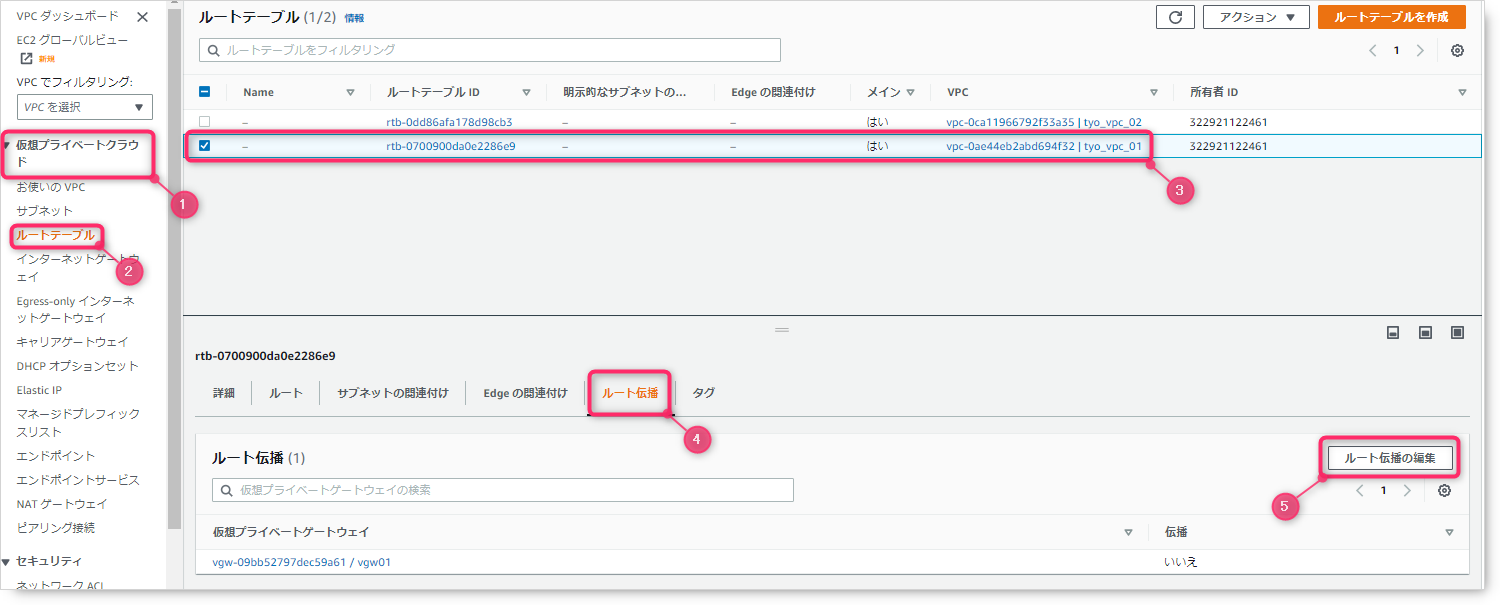
根表路由传播
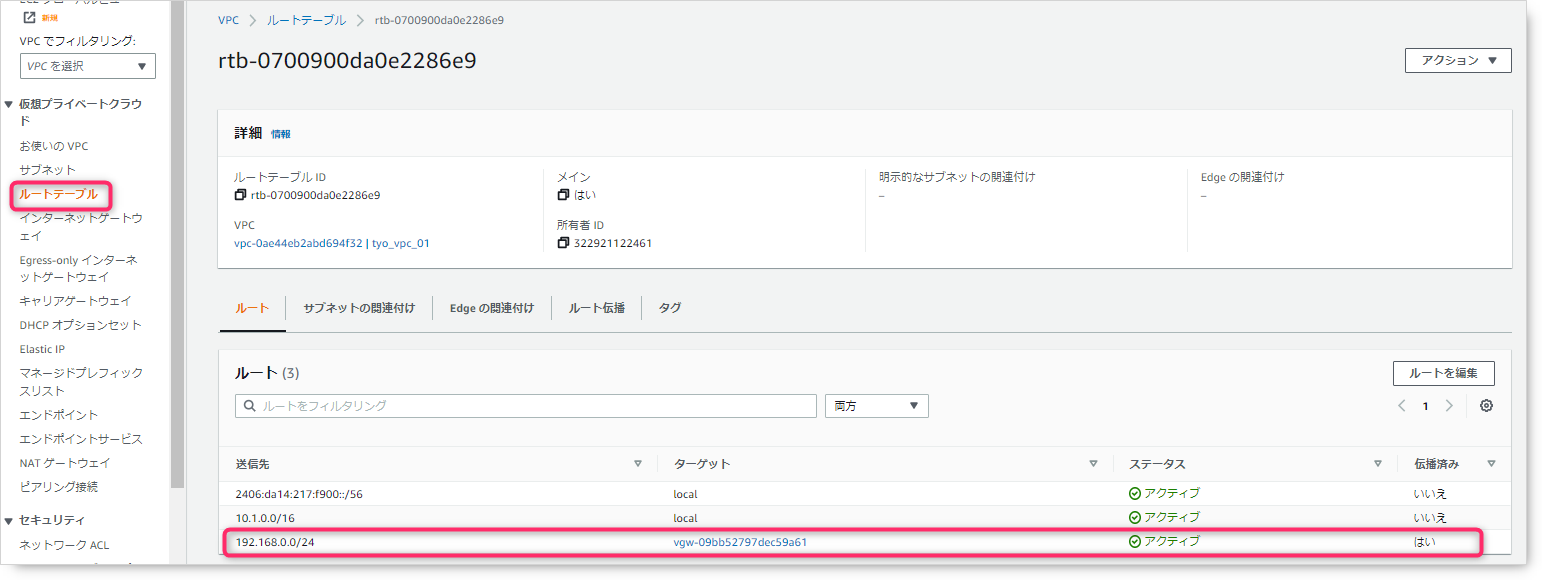
这次,为了使用 BGP 进行路由,我们将使用预先分配给 VPC(或与子网关联)的路由表来配置路由传播。
通过配置此设置,虚拟专用网关使用 BGP 获知本地路由信息(192.168.0.0/24)后,路由信息将从虚拟专用网关传播到相应的路由表,并自动安装 Masu。 。
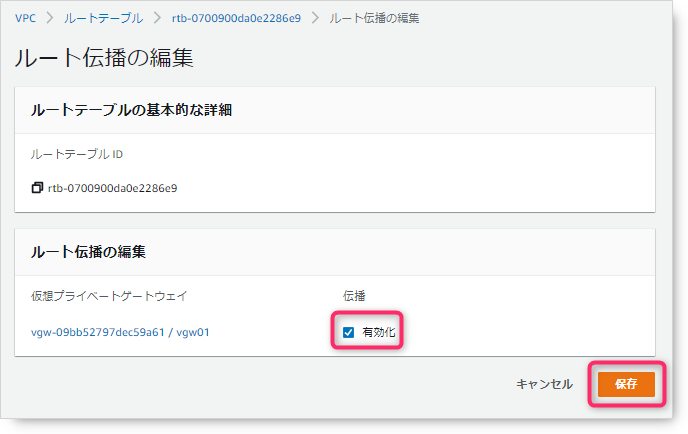
这样就完成了路由传播设置。
构筑
配置(本地 Fortigate)
接下来,我们将配置 Fortigate 端,但在此之前,如果您在 AWS 端完成 Site-to-Site VPN 配置,则可以下载包含每个供应商的示例配置和配置说明的文本。 它是一个示例配置,反映了在客户网关和虚拟专用网关中输入的值,并且很方便用于配置工作,因此请下载它。


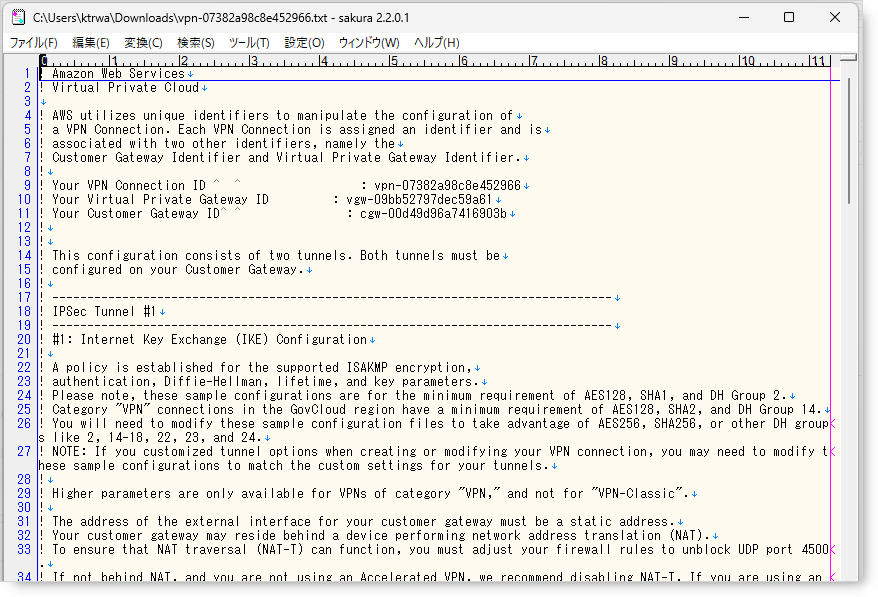
并非每个型号/版本的配置都可用。 因此,根据型号和操作系统版本的不同,配置可能不完整,因此可能需要进行一些修改以适应环境。 这次,我不会解释示例配置,而是介绍我安装的配置以及 VPN + BGP 工作没有任何问题。 (基础是示例配置)
config vpn ipsec phase1-interface
    edit "P1_AWS-vpn1-T1"
        set interface "wan1"
        set local-gw 61.26.71.188
        set keylife 28800
        set peertype any
        set proposal aes256-sha256
        set dpd on-idle
        set dhgrp 2
        set nattraversal disable
        set remote-gw 35.75.134.253
        set psksecret *********************     ★サンプルコンフィグに記載あり
        set dpd-retryinterval 10
    next
    edit "P1_AWS-vpn1-T2"
        set interface "wan1"
        set local-gw 61.26.71.188
        set keylife 28800
        set peertype any
        set proposal aes256-sha256
        set dpd on-idle
        set dhgrp 2
        set nattraversal disable
        set remote-gw 54.150.121.161
        set psksecret *********************
        set dpd-retryinterval 10
    next
end

config vpn ipsec phase2-interface
    edit "P2_AWS-vpn1-T1"
        set phase1name "P1_AWS-vpn1-T1"
        set proposal aes256-sha256
        set dhgrp 2
        set keepalive enable
        set keylifeseconds 3600
    next
    edit "P2_AWS-vpn1-T2"
        set phase1name "P1_AWS-vpn1-T2"
        set proposal aes256-sha256
        set dhgrp 2
        set keepalive enable
        set keylifeseconds 3600
    next
end

config system interface
    edit "P1_AWS-vpn1-T1"
        set vdom "root"
        set ip 169.254.244.158 255.255.255.255
        set allowaccess ping
        set type tunnel
        set tcp-mss 1379
        set remote-ip 169.254.244.157 255.255.255.252
        set snmp-index 15
        set interface "wan1"
    next
    edit "P1_AWS-vpn1-T2"
        set vdom "root"
        set ip 169.254.218.34 255.255.255.255
        set allowaccess ping
        set type tunnel
        set tcp-mss 1379
        set remote-ip 169.254.218.33 255.255.255.252
        set snmp-index 17
        set interface "wan1"
    next
end

config router access-list
    edit "ACL-192.168.0.0/24"
        config rule
            edit 1
                set prefix 192.168.0.0 255.255.255.0
                set exact-match enable
            next
        end
    next
end
config router aspath-list
    edit "ASP_LIST1"
        config rule
            edit 1
                set action permit
                set regexp "_4200000001_"
            next
        end
    next
end

config router route-map
    edit "RM_IN_1"
        config rule
            edit 1
                set match-as-path "ASP_LIST1"
                set set-local-preference 200
            next
        end
    next
    edit "RM_IN_2"
        config rule
            edit 1
                set match-as-path "ASP_LIST1"
                set set-local-preference 150
            next
        end
    next
    edit "RM_OUT_2"
        config rule
            edit 1
                set match-ip-address "ACL-192.168.0.0/24"
                set set-aspath "2100000901" "2100000902"
            next
        end
    next
end

config router bgp
    set as 2100000001
    set router-id 61.26.71.188
    set keepalive-timer 10
    set holdtime-timer 30
    config neighbor
        edit "169.254.244.157"
            set remote-as 4200000001
            set route-map-in "RM_IN_2"
        next
        edit "169.254.218.33"
            set soft-reconfiguration enable
            set remote-as 4200000001
            set route-map-in "RM_IN_1"
            set route-map-out "RM_OUT_2"
        next
    end
    config network
        edit 1
            set prefix 192.168.0.0 255.255.255.0
        next
    end
end

config firewall policy
    edit 201
        set name "ALL<--AWS"
        set srcintf "P1_AWS-vpn1-T1" "P1_AWS-vpn1-T2"
        set dstintf "any"
        set srcaddr "all"
        set dstaddr "all"
        set action accept
        set schedule "always"
        set service "ALL"
    next
    edit 202
        set name "ALL-->AWS"
        set srcintf "any"
        set dstintf "P1_AWS-vpn1-T1" "P1_AWS-vpn1-T2"
        set srcaddr "all"
        set dstaddr "all"
        set action accept
        set schedule "always"
        set service "ALL"
    next
end
我想添加一些有关 BGP 设置的附加信息。 这次有两个隧道,1 号和 2 号。 由于每个隧道都建立了一个 BGP 邻居,因此它是一个主备配置。 (如果您将其设置为Active/Active,则有可能会使用不同的隧道进行出站和回站通信。如果您使用像Fortigate这样的防火墙产品作为VPN设备,如果出站和回站发生变化,状态检查将被激活并且无法进行通信。)
虽然是主备设计,但AWS BGP 使用“AS_PATH Prepend”和“Local Preference” 的路径属性来控制路由。
“AS_PATH prepend” 使本地路由信息 (192.168.0.0/24) “从本地发布到 AWS 的路由 看起来像 ”的 AS 路径,从而使本地路由信息 (192.168.0.0/24) 成为备用路由。 这次,在发布“192.168.0.0/24”路由时,我们设置要添加并发布的AS路径“2100000901”“2100000902”。
“本地首选项 AWS 路由信息 (10.1.0.0/16) 优先于“从 AWS 本地公布的路由”的设置。 ”是一项将 这次,我们将进行设置,以便当我们从 Tunnel1 接收到包含“ASN: 4200000001”的路由信息时,我们将添加“值 200”,而当我们从 Tunnel2 接收到类似的路由信息时,我们将添加“值 150”。此时,Tunnel1 设置为 Active,Tunnel2 设置为 Standby。
我列出了接待路线和公关路线,供大家参考。
■受信网络

FGT60D # get router info bgp network
BGP table version is 37, local router ID is 61.26.71.188
Status codes: s suppressed, d damped, h history, * valid, > best, i - internal,
              S Stale
Origin codes: i - IGP, e - EGP, ? - incomplete

   Network          Next Hop            Metric LocPrf Weight RouteTag Path
*> 10.1.0.0/16      169.254.218.33         200    200      0        0 4200000001 i
*                   169.254.244.157        100    150      0        0 4200000001 i
*> 192.168.0.0      0.0.0.0                       100  32768        0 i

Total number of prefixes 2
■Tunnel1
FGT60D # get router info bgp neighbors 169.254.244.157 advertised-routes
BGP table version is 37, local router ID is 61.26.71.188
Status codes: s suppressed, d damped, h history, * valid, > best, i - internal
Origin codes: i - IGP, e - EGP, ? - incomplete
Network Next Hop Metric LocPrf Weight RouteTag Path
*> 10.1.0.0/16 169.254.244.158 200 0 0 4200000001 i
*> 192.168.0.0 169.254.244.158 100 32768 0 i
Total number of prefixes 2■Tunnel2
FGT60D # get router info bgp neighbors 169.254.218.33 advertised-routes
BGP table version is 37, local router ID is 61.26.71.188
Status codes: s suppressed, d damped, h history, * valid, > best, i - internal
Origin codes: i - IGP, e - EGP, ? - incomplete
Network Next Hop Metric LocPrf Weight RouteTag Path
*> 192.168.0.0 169.254.218.34 100 32768 0 2100000901 2100000902 i
Total number of prefixes 1Fortigate 端的设置更改到此结束。
检查状态(VPN 和 BGP)
检查AWS端的状态
从“VPC”中,选择“虚拟专用网络 (VPN)”>“站点到站点 VPN 连接”,然后选择您之前创建的“VPN01”。
如果 VPN 和 BGP 正常,状态将为“Up”,详细信息将为“1 BGP ROUTES”。
然后选择“路由表”并确认它正在从虚拟专用网关学习本地路由信息。 (显示路由192.168.0.0/24)
检查 Fortigate 状态
接下来,我们将检查 Fortigate 端的状态。
– 诊断 vpn ike 网关列表…检查 IKE 状态。 如果建立 IKE 连接,将显示以下消息。
– 诊断VPN 隧道列表… 如果VPN 连接正常,将显示中间“SA:”行下方的项目。
FGT60D # diagnose vpn ike gateway list

vd: root/0
name: P1_AWS-vpn1-T1
version: 1
interface: wan1 5
addr: 61.26.71.188:500 -> 35.75.134.253:500
virtual-interface-addr: 169.254.244.158 -> 169.254.244.157
created: 97s ago
IKE SA: created 1/1  established 1/1  time 20/20/20 ms
IPsec SA: created 1/1  established 1/1  time 10/10/10 ms

  id/spi: 1033 20d8355009e10b62/c747807e667e2dfb
  direction: initiator
  status: established 97-96s ago = 20ms
  proposal: aes256-sha256
  key: 3a98944f9fc8e679-7e9b226f40603975-1894a5dd2cad6bce-309a8c12df9853c1
  lifetime/rekey: 28800/28403
  DPD sent/recv: 00000004/234cbd2d

vd: root/0
name: P1_AWS-vpn1-T2
version: 1
interface: wan1 5
addr: 61.26.71.188:500 -> 54.150.121.161:500
virtual-interface-addr: 169.254.218.34 -> 169.254.218.33
created: 97s ago
IKE SA: created 1/1  established 1/1  time 20/20/20 ms
IPsec SA: created 1/1  established 1/1  time 10/10/10 ms

  id/spi: 1034 07ccf56926072fb6/9aa20ac3255b43ec
  direction: initiator
  status: established 97-96s ago = 20ms
  proposal: aes256-sha256
  key: ea53a3ea1ae00772-7130cdcfcb4ea762-5470c7475ed7eb68-502d44849c0c8841
  lifetime/rekey: 28800/28403
  DPD sent/recv: 00000004/1506db74

FGT60D #

FGT60D # diagnose vpn tunnel list
------------------------------------------------------
name=P1_AWS-vpn1-T1 ver=1 serial=6 61.26.71.188:0->35.75.134.253:0
bound_if=5 lgwy=static/1 tun=intf/0 mode=auto/1 encap=none/8 options[0008]=npu
proxyid_num=1 child_num=0 refcnt=6 ilast=0 olast=0 ad=/0
stat: rxp=1 txp=1 rxb=124 txb=60
dpd: mode=on-idle on=1 idle=10000ms retry=3 count=0 seqno=6
natt: mode=none draft=0 interval=0 remote_port=0
proxyid=P2_AWS-vpn1-T1 proto=0 sa=1 ref=2 serial=1
  src: 0:0.0.0.0/0.0.0.0:0
  dst: 0:0.0.0.0/0.0.0.0:0
  SA:  ref=6 options=10227 type=00 soft=0 mtu=1358 expire=3215/0B replaywin=1024
       seqno=17 esn=0 replaywin_lastseq=00000001 itn=0
  life: type=01 bytes=0/0 timeout=3303/3600
  dec: spi=ba4eece7 esp=aes key=32 2dad952128c494a9de9dbd9bd4b90f595599a83c59b0e1913b6f030acb685295
       ah=sha256 key=32 b110aa3cece99c2712f0986bc6d1a6ad9b55da091d1df8b457eb2495796046e5
  enc: spi=c40ec561 esp=aes key=32 16f60d0490d676a2cf3a83ced6a2b00dc5721037c7700b8c8aa90665b00ee3a7
       ah=sha256 key=32 3134db492e47d05fdeec7bf563195190876d2ba43fdd34d1c0ca5f9758077e2b
  dec:pkts/bytes=1/60, enc:pkts/bytes=22/3032
  npu_flag=03 npu_rgwy=35.75.134.253 npu_lgwy=61.26.71.188 npu_selid=6
------------------------------------------------------
name=P1_AWS-vpn1-T2 ver=1 serial=7 61.26.71.188:0->54.150.121.161:0
bound_if=5 lgwy=static/1 tun=intf/0 mode=auto/1 encap=none/8 options[0008]=npu
proxyid_num=1 child_num=0 refcnt=6 ilast=1 olast=1 ad=/0
stat: rxp=1 txp=1 rxb=124 txb=60
dpd: mode=on-idle on=1 idle=10000ms retry=3 count=0 seqno=4
natt: mode=none draft=0 interval=0 remote_port=0
proxyid=P2_AWS-vpn1-T2 proto=0 sa=1 ref=2 serial=1
  src: 0:0.0.0.0/0.0.0.0:0
  dst: 0:0.0.0.0/0.0.0.0:0
  SA:  ref=6 options=10227 type=00 soft=0 mtu=1358 expire=3214/0B replaywin=1024
       seqno=1d esn=0 replaywin_lastseq=00000001 itn=0
  life: type=01 bytes=0/0 timeout=3301/3600
  dec: spi=ba4eece8 esp=aes key=32 8a2500d622f863b785023850ffa03c8f23ddcacb4387398fe4a166c72e13e7b5
       ah=sha256 key=32 b24f59d76728fd3e8a0f1fdb663394257fd551b53bcf9def0dd403361173fb8c
  enc: spi=ccab7328 esp=aes key=32 c73f9f1fb27c2eab8a5d165886a3391c7ec1c6018249792124e8ef1f4c755f71
       ah=sha256 key=32 c15211347b1e7807ef8fe6a64478f06a265e2d3b91def77409e89749e6b34a3c
  dec:pkts/bytes=1/60, enc:pkts/bytes=28/3792
  npu_flag=03 npu_rgwy=54.150.121.161 npu_lgwy=61.26.71.188 npu_selid=7

FGT60D #
– get router info bgp Summary … 如果正常,会显示每个邻居的 Up 时间,并且 State/PfxRcd 为 1(或大于 1 的整数)。
FGT60D # get router info bgp summary
BGP router identifier 61.26.71.188, local AS number 2100000001
BGP table version is 4
2 BGP AS-PATH entries
0 BGP community entries

Neighbor        V         AS MsgRcvd MsgSent   TblVer  InQ OutQ Up/Down  State/PfxRcd
169.254.218.33  4 4200000001      19      19        3    0    0 00:02:16        1
169.254.244.157 4 4200000001      15      17        3    0    0 00:01:57        1

Total number of neighbors 2


FGT60D #
– 获取所有路由器信息路由表…确保您正在使用 BGP 在 VPC 中学习 10.1.0.0/16。
FGT60D # get router info routing-table all

Routing table for VRF=0
Codes: K - kernel, C - connected, S - static, R - RIP, B - BGP
       O - OSPF, IA - OSPF inter area
       N1 - OSPF NSSA external type 1, N2 - OSPF NSSA external type 2
       E1 - OSPF external type 1, E2 - OSPF external type 2
       i - IS-IS, L1 - IS-IS level-1, L2 - IS-IS level-2, ia - IS-IS inter area
       * - candidate default

S*      0.0.0.0/0 [5/0] via 61.26.71.129, wan1
B       10.1.0.0/16 [20/100] via 169.254.244.157, P1_AWS-vpn1-T1, 00:04:07
C       61.26.71.128/25 is directly connected, wan1
C       169.254.218.32/30 is directly connected, P1_AWS-vpn1-T2
C       169.254.218.34/32 is directly connected, P1_AWS-vpn1-T2
C       169.254.244.156/30 is directly connected, P1_AWS-vpn1-T1
C       169.254.244.158/32 is directly connected, P1_AWS-vpn1-T1
S       192.168.0.0/16 [10/0] is directly connected, P1_IPSEC_RTX
C       192.168.0.0/24 is directly connected, internal1


FGT60D #
通讯确认及故障测试
通讯确认
接下来,从本地环境检查 ping 和 ssh。
C:\Users\ktrwa>ping 10.1.1.100

10.1.1.100 に ping を送信しています 32 バイトのデータ:
10.1.1.100 からの応答: バイト数 =32 時間 =20ms TTL=253
10.1.1.100 からの応答: バイト数 =32 時間 =19ms TTL=253
10.1.1.100 からの応答: バイト数 =32 時間 =15ms TTL=253
10.1.1.100 からの応答: バイト数 =32 時間 =14ms TTL=253

10.1.1.100 の ping 統計:
    パケット数: 送信 = 4、受信 = 4、損失 = 0 (0% の損失)、
ラウンド トリップの概算時間 (ミリ秒):
    最小 = 14ms、最大 = 20ms、平均 = 17ms

C:\Users\awsgood>
主备测试
如前所述,AWS 的站点到站点 VPN 使用两个隧道和使用 BGP 的路由。 因此,即使一个隧道出现故障,通信也应继续使用另一隧道。
我们将尽快关闭 Tunnel1 接口,生成伪故障,并检查通信是否继续。
FGT60D # config system interface
<省略>
FGT60D (interface) #
FGT60D (interface) #     edit "P1_AWS-vpn1-T1"

FGT60D (P1_AWS-vpn1-T1) # set status down

FGT60D (P1_AWS-vpn1-T1) # end

FGT60D #查看路由表,10.1.0.0/16的路由信息是通过BGP获知的,但输出接口为“P1_AWS-vpn1-T2”,且为Tunnel2。 (之前正常操作期间,Tunnel1 为“P1_AWS-vpn1-T1”)
FGT60D # get router info routing-table all

Routing table for VRF=0
Codes: K - kernel, C - connected, S - static, R - RIP, B - BGP
       O - OSPF, IA - OSPF inter area
       N1 - OSPF NSSA external type 1, N2 - OSPF NSSA external type 2
       E1 - OSPF external type 1, E2 - OSPF external type 2
       i - IS-IS, L1 - IS-IS level-1, L2 - IS-IS level-2, ia - IS-IS inter area
       * - candidate default

S*      0.0.0.0/0 [5/0] via 61.26.71.129, wan1
B       10.1.0.0/16 [20/100] via 169.254.218.33, P1_AWS-vpn1-T2, 00:01:05
C       61.26.71.128/25 is directly connected, wan1
C       169.254.218.32/30 is directly connected, P1_AWS-vpn1-T2
C       169.254.218.34/32 is directly connected, P1_AWS-vpn1-T2
S       192.168.0.0/16 [10/0] is directly connected, P1_IPSEC_RTX
C       192.168.0.0/24 is directly connected, internal1


FGT60D #
当我检查 AWS Site-to-Site VPN 的状态时,我发现一侧已关闭。
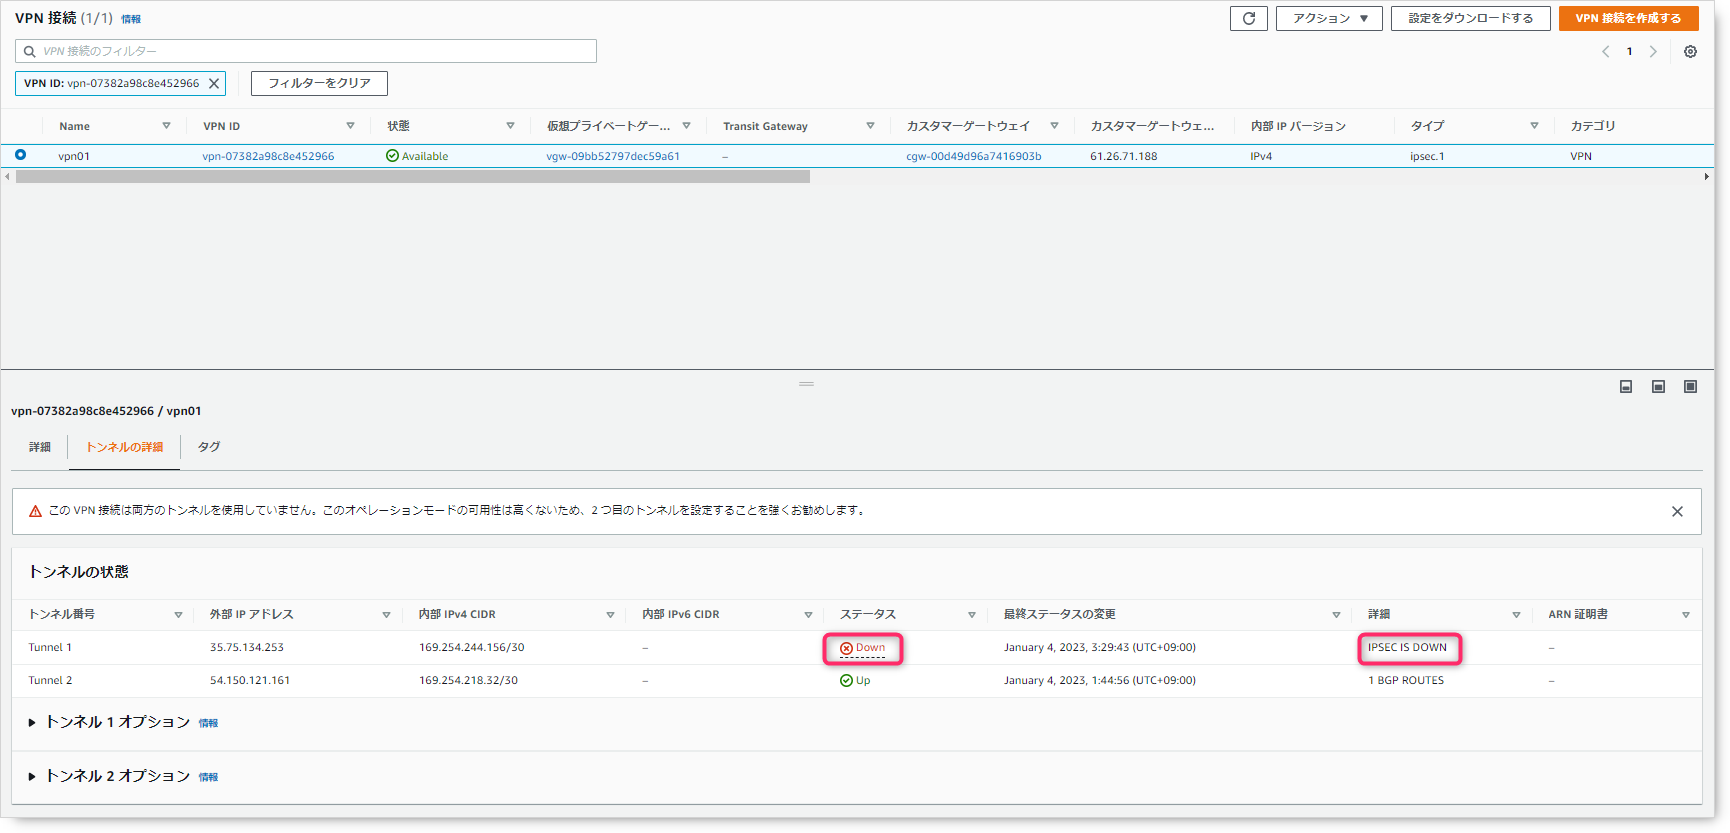
在此状态下,如果从本地客户端使用 ping 和 ssh 检查通信,则没有问题。
C:\Users\awsgood>ping 10.1.1.100

10.1.1.100 に ping を送信しています 32 バイトのデータ:
10.1.1.100 からの応答: バイト数 =32 時間 =17ms TTL=253
10.1.1.100 からの応答: バイト数 =32 時間 =18ms TTL=253
10.1.1.100 からの応答: バイト数 =32 時間 =17ms TTL=253
10.1.1.100 からの応答: バイト数 =32 時間 =16ms TTL=253

10.1.1.100 の ping 統計:
    パケット数: 送信 = 4、受信 = 4、損失 = 0 (0% の損失)、
ラウンド トリップの概算時間 (ミリ秒):
    最小 = 16ms、最大 = 18ms、平均 = 17ms

C:\Users\awsgood>
通过以上步骤,我们已经确认,即使其中一条隧道发生故障,通信也没有问题。 (当然,如果 Fortigate 端的互联网连接出现故障,隧道 1 和 2 也会出现故障,从而无法进行通信。)
概括
以上是使用Site-to-Site VPN的搭建过程。 AWS端的GUI非常容易理解,我认为任何为企业产品设计过VPN的人都可以立即构建它。 此外,通过下载示例配置,旨在减轻客户的负担并减少工时,使本地用户的构建变得极其容易。
以后我会单独写一篇文章来写中转网关的搭建以及和我这次搭建的VPN的配合。